Tuesday, November 26, 2013

It's a High Tea Bridal Shower.

  Posting two days in a row after being away from my blog for about two months is a good sign. So what have I been doing all this time? A good part of my time was spent making Christmas cards, invitations for my neice's wedding and birthday decorations for my granddaughters.
  That was only some of it. Mainly, I have been gone. My husband and I spent a month in Europe. We took a two week river cruise from Budapest to Amsterdam. After spending 2 days in Amsterdam, we took a train to Paris. From there, we ventured to Bayeux to explore the beaches of  Normandy and Mont St. Michel before heading back to Paris to catch a flight home.
  Home for less than I week, I once again left for Jersey to attend my neice's shower. I volunteered to make the 55 shower invitations, but this time I enlisted some help from my sister, the MOB. Since it was a High Tea, I made a tea bag invitation.
  

Her bridal colors are red, black and white. The wedding invitations had a damask design to them so I added it on the tea bag invite.


  The shower was wonderful. The food was outstanding. For favors, each guest took home two shorbread cookies which I made at my sister's house the day before the shower. I never took pictures, but the cookies looked similar to these.


 It is good to be home. Now it's a mad rush to finish my Christmas cards.  Thanks for stopping by to take a peek.

Sunday, November 24, 2013

November PTI Blog Hop: Paper Houses

  It's been awhile since I last updated my blog. But hopefully, I will be able to get back in the swing of things and start posting regularly. It's been a whirlwind the past couple of months, but I'll save that for another day. So what enticed me to post?? That could only be one thing. Pti's monthly Blog Hop. The challenge this month is to create a paper house!!!! I couldn't resist.

November-Blog-Hop-Challenge

 My house isn't displayed in any fancy way. In fact being able to finish it, take a photo and upload it to my blog on time is a major accomplishment in itself.


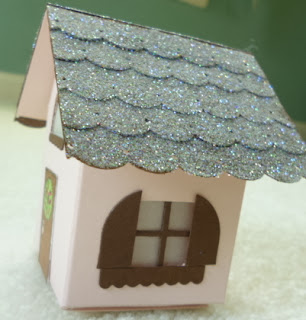
 I used the template provided. The shutters & door were made using the Banner Builder Dies. I used vellum and  the square print die for the windows. The heart came from the Tiny Tag dies. The tree was made using the Layered Postmark die.

A side view of the house.


My 2nd house used a different template.  It was a little smaller. I cut a semi circle for the front window.

A side view: I used Prisma Glitter on the scalloped roof.

Here's the houses side by side.


  These houses were fun to make;but, a little time consuming.  I had wanted to put the pink house on a base and add a picket fence using the die, but didn't have enough time. I would like to find a template for a church to add to these two house. If time permits, I might make one.

Thanks for stopping by to take a peek. I can't wait to see all the other houses. I am sure they will be beautiful.


Wednesday, October 2, 2013

Decorations for a Fairy Birthday party

  Last month, my granddaughter celebrated her 5th birthday. She wanted a fairy party. Luckily I had a fairy stamp to use for her invitations. Being a lover of the colors purple & pink, her invitations looked like this.

   I precut the scalloped circles. After I stamped the image in Versamark, she sprinkled on the glitter. You should have seen her eyes as the fairy magically appeared right before her eyes. She & her mom assembled the invites when she went back home.

I always make a banner for my granddaughters'birthdays. Here is the one I made for the fairy party.

 Of course I kept the same colors as the invitations.  I used doilies as the background.  However, I ran out half way through and when I went to replenish my supply, I couldn't find the same pattern. SoI alternated the doilies.

This year I made welcome signs for the birthday parties. While browsing through Michaels one day, I found this piece of wood. It made a fantastic sign in keeping with the fairy theme. I used stickers for the message.


On the door greeting the party goers.

This is the garland I made to hang by the fireplace.

I usually make paper garland.  However, this time I decided to use the left over flowers I purchased to make the fairy head pieces.  You can check out the fairy crowns  from a previous post.
Here's an upclose shot of the garland.


 One of the activities the girls did was to make fairy gardens. My daughter painted the houses as she didn't want her kitchen painted pink & purple by 5 year olds.  Aren't these darling?


They are all so serious!

 Tomorrow I'll be back with more decorations I made such as the centerpiece in the above picture.
Thanks for stopping by to take a peek.

Wednesday, September 25, 2013

A fairy Crown


My granddaughter celebrated her 5th birthday last week. She had a Fairy Birthday party on Saturday. I made 7 of the fairy crowns for all the little girls who came to her party.

As I was perusing all the blogs from PTI's September Blog Hop, it dawned on me that I could submit this fairy crown to the challenge as I used the green leaf ribbon from PTI.


A photo of my granddaughters wearing their fairy crowns.

Thanks for stopping by to take a peek. Come back tomorrow when I post some pictures of other party decorations I made.

An Autumn Wreath

     I spent most of Tuesday afternoon making a birthday card and anniversary card thinking I would be relaxing by the tv watching some new shows at night. Then it hit me. PTI's September blog Hop. I still needed to make my card. I am not a fast card maker. Luckily, I had an idea. Now to bring it to fruition.

The challenge is to create a wreath on the front of a festive card.  


A peek at the inside.


You can see that I used Card Basic as my foundation. I added some bling by glittering some 1/4"score tape. along the sides. I still need to stamp a sentiment on the inside; most likely a simple,  "Happy Thanksgiving".

This card also works perfectly for the challenge at Cas-ual Fridays blogspot. It's been awhile since I played along.


I'm also submitting this card to the 2013 Thanksgiving Crusade hosted by Susan Raihalaand Casology# 63 where the cue word is AUTUMN.

Thanks for stopping by.

Monday, September 23, 2013

More Minnie Mouse Decorations!

  Here's my granddaughter Lilly wearing the Minnie Mouse ears I made for her party.


 In fact, I made a total of twenty Minnie/Mickey Mouse ears using this tutorial from The Subuurban Mom.

I even had ears for the adults!  What fun everyone had wearing them.


  I made a centerpiece for the table, but forgot to take a picture. Here's a peek of it cropped fron another photo. I sprayed some styrofoam balls.


 These are the tags I made for the party favors!

 An up close shot.

The adults received a bag of cookies


while the kids got a Minnie Mouse Rice Krispie Pop.


I cut out some different sizes of Minnie Mouse bows to make garland.  Too bad my daughter hung them up side down.


I wrapped the gifts in pink paper and added circle stickers to mimic Minnie's bow.

                                                  
I added the same white dots to the pink balloons but you can barely see them in the picture.


Here's the cake my son-in-law iced.

 To end, a picture of my two granddaughters show casing their Minnie Mouse ears!


Thanks for stopping by to take a peek

Sunday, September 22, 2013

Lilly's Birthday! Minnie Mouse Style

    It has been awhile since I posted. I've been feverishly crafting; just too tired to take pictures to upload to this blog. Since July, I have been busy making decorations for my two granddaughters'birthday parties.  Lilly turned 3 at the end of August.  She wanted a Minnie Mouse party.

   Lilly wanted to make the invitations with her mom.  This is what they looked like. Slightly larger than the standard size card.


   I used my Wishblade to cut the Minnie Mouse Shape.  I found an image of the bow and formatted it to the desired size before printing it on the pink pattern paper.   Lilly was so excited when she saw the invitation she was going to put together. Love the little ditty I found somewhere on the internet.


 This was the sign I made to hang on the front door welcoming the party guests!

  My granddaughters love the birthday banners I make for them every year. This year was no different


An up-close shot.


   That's all for today. I'll post more of my Minni Mouse decorations tomorrow. http://craftymagra.blogspot.com/2013/09/more-minnie-mouse-decorations.html 
Thanks for stopping by to take a peek.