Friday, September 30, 2011

A Year of Birthday Treats

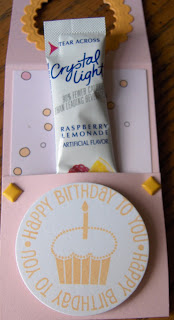
     Being an Intervention Specialist at a high school, I work with many different teachers.  I like to give each one a little treat on his/her birthday. In doing so, the cost of the treat has to be minimal.  While visiting "My Egg-Citing Life by Gina, I came across a treat she made for her son's new preschool teacher. Her creation inspired me to make a couple for those teachers having September birthdays.


     A close up shot of the tag.
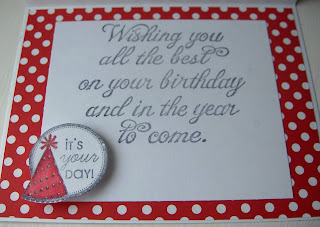
 These were super easy and quick to make, costing less than fifty cents.  It also let me use up my scaps of pattern papers.  Last but not least, it was a hit with the two teachers that already had birthdays.  I'm going to try and make the rest of them (about 15) this weekend so all I have to do is assemble the treat when the next birthday rolls around as I bought a case of water and two packages of Crystal Light.  Oh, the next birthday that's on Wednesday of next week already.
Thanks for looking!

Monday, September 26, 2011

Minnie Mouse Birthday

     We were invited to a birthday party for a 5 year old on Saturday.  Minnie Mouse was the theme of this party. Since I don't own any Minnie Mouse stamps, I Googled images for MM.  This is the image I retrieved off the internet.


Isn't she cute?  I mounted the image onto the scalloped Limitless Label die.

 My card.  Pretty simple.

     I framed the sides of the card with black polka dot ribbon. The sentiment was stamped on the newly released photo finisher die cut.  I threaded ribbon through this die.


   Last but not least, the inside of the card.

     Kelly loved the card.  So did her mom.  After mom frames it, the card will be added to the other elements of her Minnie Mouse bedroom.
     Thanks for looking.

Supplies: CS: white
Stamps: PTI"s 2011 Birthday Tags, Northwood,s Birthday Sentiment
Die: Photo Finisher, Limitless labels
Other: PP paper from stash, polka dot ribbon, dimensionals

Sunday, September 25, 2011

September 2011 Blog Hop


  Today is Papertrey Ink's monthly blog hop.  Nicole has been using images the past couple of months to get our creative juices flowing.

The-Challenge
  Sept-Blog-Hop-Inspiration


   To be perfectly honest, I had a hard time with this challenge because I am not really a stripe person. I am more of a polka dot girl.  In addition, I did not like the colors.  My card reflects the stripes on the left side of the image above.


  I used the die that coordinates with the newly released Christmas Label stamp set.

Here's a close-up of the shoe.  The fluffy puff on the shoe is a feather curled up and trimmed. The shoe is popped up with dimensionals.

     If I am not too late, I think I will submit this for Color Throwdown #160 here.
Thanks for looking. 

Supplies: PTI CS: Vintage Cream, Sweet Blush, Dark Chocolate.
Ink: Archival Ink,  Sepia
Stamps: PTI's Polka Dot Basic, Impression Obsession's Marabou Slipper
Die: Christmas Label
Other: feather, dimensionals, CopicRV10

Saturday, September 24, 2011

The Last of the Purple Ladybugs

     My son asked me to make a birthday card for him to give to my granddaughter on her birthday.  Couldn't resist doing another purple ladybug card.  Except for the image from Little Lady, this one is completely different.


     The background paper is from PTI's Happy Spots.  It looks so much better in person as the color is washed out in the photo.  The background on the Mat Stack 3 was stamped with one of the stamps from Polka Dot Basic as I do not yet own the stamp set for Mat Stack 3. I loved how this card  turned out.

     A detailed glimpse of the ladybug.

     My son is a jokester.  On the back of the card, he wrote Handmade by: Mike.  We all had a good laugh over that one.

Supplies: CSWhite, PTI Royal Velvet
Stamp Set:  Little Lady, 2011 Birthday Tags, Polka Dot Basics
Die: Limitless Labels, Simple Circles, Mat Stack 3
Other: Happy Spots PP, buttons, embroidery floss, dimensionals


Friday, September 23, 2011

Purple Ladybug Birthday Card

     Keeping with the purple ladybug theme (see previous post) this is the card I created for my granddaughter's 3rd birthday.  I used the large ladybug image from Little Lady.  The 2 ladybugs on the bottom of the card were stamped directly on the white cardstock. I fussy cut a ladybug and used dimensionals for the top one.  I also used dimensionals under the wings to make it appear like the ladybug was spreading its wings.

  The flower was made with the Beautiful Bloom die and Royal Velvet cardstock.  Thanks for looking.

Supplies: White CS, Royal Velvet
Stamps: Little lady, Polka Dot Basics, Make a Wish Additions
Die: Beautiful Bloom
Other: Purple button, white twine, dimensionals

Thursday, September 22, 2011

Purple Ladybugs

     My 3 year old granddaughter celebrated her 3rd birthday this month.  The theme for her birthday party was ladybugs.... not just any ladybugs, but PURPLE ladybugs. (In case you haven't figured it out, purple is her favorite color.)  She and her mom made invitations in the shape of purple ladybugs.  I made the rest of the decorations for the party.

    Let it be known that I am a purist.  The thought of purple ladybugs was incomprehensible to me. I originally was going to make all the decorations red.  However, when she overheard me talking to her mother, she said, "No Grandma, I don't want red ladybugs. Purple."  Being a grandma, I couldn't resist her wishes, so I caved in. 

  During my search of a variety of website for party ideas, I came across an idea of a lollipop wrapped in tissue paper with black spots on it.  Since I never tagged it, I wasn't able to relocte it.  Luckily for me the idea was so simple, I was able to reproduce it. I just used a Sharpie for the black dots that I randomly placed on a double layer of 4 x 4 purple tissue paper.  The original idea used black pipe cleaners to secure the tissue paper.  However, since I did not have any black pipe cleaners when I began this project, I used some purple jute I had in my stash.  These went in the goody bags.  Of course I made enough for all the adults too!


     The next thing I made was a Happy 3rd Birthday banner.  Below is a picture of only part of the banner.  The entire banner was too long to get a good photo of.  I really liked how it turned out.  It was so cute. The ladybugs looked soooo cute in purple.
   A close up of a ladybug in the banner.

  I wanted something different for the table.  I took the biggest Nestie I had, and made a medallion to resemble a flower.  I used one of the flower fusion dies as my center and added a purple ladybug on each side.  I had these mini clay flower pots that I used for the base. I stuck a piece of syrofoam inside and used a wooden BBQ skewer for the stem.


Altogether I made 3 flowers  to spread out along  the main table.


 Of course no party is complete without party hats.  Keeping the theme of purple ladybugs, this is what I created. I got the idea from here.


  The birthday girl had her own special hat.(In purple of course with 3 purple ladybugs crawling all over the # 3.) 

 
  The last minute I decided to make chocolate covered pretzel ladybugs.  I lucked out and got the last batch of purple melties at Michaels.  My chocolate covered pretzels did not look like any of those on Pinterest, but I can tell you they were the hit of the party.  Each person got to take home 2 pretzels in a glassine bag. (I ran out of time to decorate them).   I set out a tray of chocolate covered ladybug pretzels when the cake was being served. They were gone in no time. 

  Now some of you are thinking I might have carried the purple ladybug idea too far when you see how I wrapped my granddaughter's birthday presents.  The black dots were made with my Wishblade and taped on the gift randomly.
   The other gift was wrapped with white paper stamped with the large ladybug image from PTI's Little Lady.
I only stamped the side of the paper that was to be the top of the present.  The purple ink I used was light and did not photograph well.

   A look at the finished package.


    Thank you for stopping by.  Tomorrow I shall post the birthday card I made for my granddaughter.  Do you think it will be purple with ladybugs? (wink)

Wednesday, September 21, 2011

A Special Card for a Special Daughter

 It's been crazy around here. September is a big month of birthdays in my family.  I have been busy making so many decorations for my granddaughter's 3rd birthday party which was held on Saturday. However, today's post showcases the card I made for my daughter's birthday which was on Saturday (Sept. 17th); the day of my granddaughter's party.

I have a great relationship with my daughter. I am so blessed as she brings so much joy into my life.  I used the new Bloom Builder 3 die.  I love the way her card turned out.  It is as beautiful as she is.

   Originally I had planned to soften the doily by sponging it with ink.  However, I didn't have a color that coordinated with any of these pinks. The sentiment is from 2011 Birthday Tags.


Here's a close-up shot of the flower.  I just love this die.
  Stop by tomorrow to see all the decorations I made for my granddaughter's ladybug birthday party!

Supplies:  CS Sweet Blush, Scarlet Jewel
Stamps:  Fillable Frame #4, 2011 Birthday Tags
Dies: Bloom Builder 3, Fillable Frame #4
Other: Hibiscus Burst Ribbon, Scarlet Jewel button, doiley, colored pearls

Sunday, September 11, 2011

To Have and to Hold

        A friend's daughter got married yesterday.  It was a small family wedding, so we weren't invited. Nevertheless I still wanted to let her know we were thinking of her on this special day. 
     I whipped  up this card a couple of days ago, but couldn't take photos since the weather has been so dreary.  I have a tendency to use this layout for most of the wedding cards I make, putting a different spin on each one.  Since I didn't know her colors, I went with a simple black & white combo.

    I used the Damask IP on the bottom half of the card.  If you look closely, you can see the impressions.  I have found that the best sandwich for embossing with PTI's impression plates using the cuttlebug is:
A plate
IP
Paper
Tan Mat
Metal shim
TWO B plates.
 This sandwich  is bottom to top.  Works like a charm everytime.

     The sentiment is from a vellum sheet of wedding sentiments I bought about 3 years ago.  This was one I had leftover.  It fit perfectly on the Half & Half die.  The bottom flourish from Half & Half is stamped in Fresh Snow. 


  I used PTI's 1/4 inch silk ribbon to make a double loop bow.  The resin flowers are from Michael's Recollection collection.  The leaves are from PTI's couture ribbon line: Leaf Ribbon. (I noticed the ribbon tail was tucked under the bow when I took the photo)


 For the inside I also used the Damask IP plate with the Half & Half Die. I have been using the Half & Half die lately on the inside of my cards. 

    
      Thanks for looking. All comments are appreciated.


Supplies:
CS: True Black, White
Ink: Fresh Snow, Memories Black
Stamps: Half & Half
Other: silk ribbon, Damask IP, Half & Half Die, Leaf Ribbon, vellum sentiment

Tuesday, September 6, 2011

Masculine Birthday Card #3

  This is the last masculine birthday card I need to make for the month of September.  However, I still have 3 more bithday cards to make before the month is up. Since I made the last two masculine cards using the stamp set, Make A Wish Additions, I decided to do something a little different this time.  I chose Peaceful Gardens. The layout is similar to the one Maile Belles did when this set was released in July.

   The kraft cardstock was stamped with Tim Holtz's Distressed Ink, Peeled Paint.  I used the Woodgrain IP on the kraft cardstock, but you can barely see it in the picture. To give this card more texture, I die cut the bamboo and used dimensionals to prop it up.

 Here is a close up of the images I stamped on the Half & Half die.  The sentiment is also from Peaceful Gardens.

 The inside sentiment is a combination of a stamp from 2011 birthday Tags and my computer.
 The only thing left is for me to sign it and pop it in the mail.  Guess that button is going to cost more to mail. Thanks for looking.

Supplies: CS: Ocean Tides, Kraft, Vintage Cream
Ink: Tim Holtz's Distressed Ink, Peeled Paint, Memories Black
Stamp Set: Peaceful Garden, 2011 Birthday Tags
Dies: Half & Half, Peaceful Gardens
Other: Woodgrain IP, twine, PTI Button, dimensionals, computer, copics

Saturday, September 3, 2011

Masculine Birthday Card #2

    My uncle turns 89 on the 13th of September.  Earlier this summer, my aunt told me he was turning 90.  I originally had a different card in mind focusing on the 90.  However, I remembered my mother-in-law telling me that he was born the same year she was born.  She is turning 89 on October 1st.  After doing a Google search, I learned that he is indeed turning 89 this year.  I had to come up with plan B.
    I decided to use the birthday present image from Make A Wish Additons that I used in the first masculine card I made earlier this month.  Since blue is my uncle's favorite color, I chose Enchanted Evening as the base.  Several months ago I bought the Simple Circles die.  Having yet to use it, I was determined to incorporate it into my card.  This is what I came up with.

   You can't really tell from the photo, but I used the linen canvas IP on the Enchanted Evening cardstock.  It really does add some texture to the card.

 Here is a close up of the Fillable Frame #1. 
                        
 I used the Tiny Tags Die to cut out the star and stamped the "Celebrate" sentiment from Mixed  Messages.

A close up shot of the presents.

                                   
 Once again I fussy cut the presents.  I used dimensionals to prop up the presents.


 Wanting to get more use out of Half & Half, I use both the sentiment & die for the inside.


   I finished my third masculine birthday card for the month of September tonight.  I'll be taking pictures tomorrow so I can post that one.   Thanks for looking.

Supplies:  CS: PTI Enchanted Evening, Pure Poppy; Bazzill Blue
Ink: Memories Black; Colorbox Dark Blue
Stamps: PTI Make A Wish Additions, Half & Half, Mixed Messages; Hero Arts Cupcakes
Dies: PTI Half & Half, Simple Circles, Tiny Tags, Fillable Frame #1
Other: PTI Twine, Linen IP, Pure Poppy button, dimensionals, Distressed Dots PP