Tuesday, January 31, 2012

Hugs & Kisses

    Today's Valentine card was inspired by Joyce @ http://cards-by-the-sea.blogspot.com/2012/01/valentines.html.  I decided to take it a step further and arrange the border strips into a heart shape. I used my Wishblade to cut the white, heart base.


I had these cute llittle x's and o's from a valentine kit purchased years ago at Target in the Dollar Hot Spot section. I thought they fit perfectly on the little hearts. After I attached the heart and drew a frame around it, I felt the card needed some more dimension. I  used PTI's 1/8" silk ribbon to make a double bow.  I love this ribbon. It is one of those items I keep using over and over. I have both sizes and just reordered another spool of each to  make sure I always have it on hand.


    A close up of the sentiment stamped in Memento's London Fog.


   This card measures 6" by 71/2".  I had previously cut the heart shape for some other valentine cards I made. The shape was too large for the A5 size card. Thanks for stopping by.


Supplies:  PTI CS: Stamper's Select White, Hibiscus Burst, Pure Poppy, Rasberry Fizz, Sweet Blush
Ink: Memento: London Fog
Stamps: Whale; 2010 Love Tags
Other: Wishblade cut heart, milicon pen, 1/8" PTI silk ribbon,Pure Poppy Ribbon.

Monday, January 30, 2012

Celebrate!!

   I needed to make a card that was masculine, but quick. I didn't want to replicate any of the masculine cards I have already done. So I grabbed some pattern paper (7 gypsies: Venice) and my new Celebrations die from PTI  to create this CAS card.


     I sponged some London Fog ink (Memento) around the sentiment. Sorry for the blurred picture. The border is the bottom half from the heart border die.

     
  I stamped one of the frames from the Celebrations stamp set onto White Rustic cardstock using Soft Stone ink.(Memories)

    Thanks for stoppying by.

Sunday, January 29, 2012

CAS Valentine Card

     I had planned to get a lot of crafting time in this weekend, but once again that didn't materialize.  But the good thing is I got a lot of time to spend with my grown children. On Saturday, I spent the morning with my daughter & my two granddaughters shopping and going to lunch. On Saturday evening, my husband & I babysat so my daughter & her husband could have a date night.
    This morning, I got some time to spend with my son who dropped by for a short visit. He lives about 75 minutes away. We had a very nice visit; so much better than the weekly phone call.
    Here a CAS valentine card using a Hero Art rubber stamp with PTI's Simple Valentine paper and the  Mat Stack 5/Mega Mat Stack 5.  I just love the Simple Valentine design paper.


     I wanted to add some dimension. The ribbon is PTI's 1/4 inch silk ribbon. I tinted it using VersaMagic ink (Pixie Ddust) diluted with a little water. The large rhinestone on the ribbon is actually red; not pink. Here's a close up shot of the stamped image.


      Thank you for stopping by. If all goes as planned I'll be posting some birthday cards this week as both my neice & nephew celebrate their birthdays within the next few days.

Friday, January 27, 2012

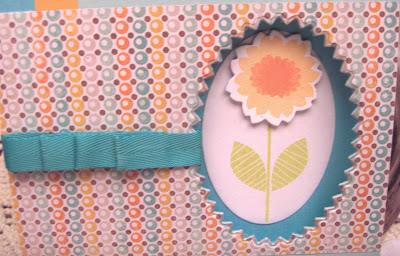
Wishing You Well

     I used my new Oval Limitless Layer die to create this get well card for my neighbor (Bunni  on the PTI forum) who just had knee replacement surgery on Tuesday. I wanted something bright & bold. I had this piece of pattern paper left over from the mini album I made for my husband.


     The card base is Hawaiian Shores. I added a strip of Summer Sunrise & Aqua Mist. I ran my die through my Cuttlebug 7-8 times to cut through all 4 layers.  Believe me this was no easy task.


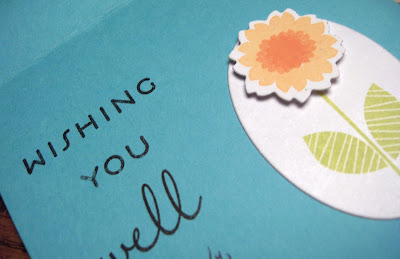
     A shot of the inside sentiment. I used selective inking on the sentiment from Think Big Favorites #7.


     Of course I couldn't just give her a card. There's some PTI goodness in her inbox when she gets home.
Thanks for stopping by. I hope you have a nice weekend. My intentions are to spend a lot of my time crafting after I get my house in order and the laundry done.

Supplies: PTI CS: Hawaiian Shores, Summer Sunrise, Aqua Mist, Select White
Ink: Memento: Cantaloupe, Pear Tart; Memories: Black
Stamps: Flower Fusion #4, Think Big Favorite #7
Dies: Oval Limitless Layers, Flower Fusion #4
Other: My Mind's Eye DP, Hawaiian Shores Twill Ribbon, dimensionals

Thursday, January 26, 2012

Thankful Thursday

     Every Thursday, Rhonda features a Thank You card on her blog: stampnpiece.  She asked me to play along with her this week.  I immediately knew I wanted to use my new Mega Mat Stack #5 as my card base as featured in one of Betsy Veldman's cards during PTI"s January release week.  Once again I used Ocean Tides for my cardstock.


       I love the Harvest Berries stamp. Tim Holt's Distressed ink: Peeled Paint was used. If you look closely in the picture above, you might notice that I used the Linen & Canvas IP on the base card.
      The sentiment is in PTI's new Dark Chocolate ink. (I just love this ink color) The sentiment is from the complimentary stamp set PTI gave out in December/January. The design of this card just evolved as I played with some of the Harvest Berries die cuts.

    Overall, I am happy with the way this card turned out. I don't have anyone in mind as to who will receive it.  Now I'll be ready when I need a thank you card.  Thanks for stopping by. Check out Rhonda's blog to see her beautiful card.   While you're at it, make a thank you card for your stash and play along.

Supplies: CS: PTI Ocean Tides, Rustic White
Stamps: Harvest Berries
Ink: PTI: Dark Chocolate; Tim Holtz: Peeled Paint
Dies: PTI: Mega Mat Stack #5, Mat Stack #5, Harvest Berries
Other: IP: Linen & Canvas, Twine, Ocean Tine Button, dimensional

Wednesday, January 25, 2012

PTI"s Blog Hop January 2012


Decisions, decisions, decisions!  The challenge for January's Blog Hop sponsered by PTI was to  pick your  favorite project from 2011 and share it!  To take it a step further, we were also challenged to create a second card that was inspired by the favorite one selected.    You can check here for all the details.
  The card I picked that was my favorite was a masculine card I made for rmy son-in-law's 35th birthday.


     There are many reasons why I love this card. Not only does it have one of my favorite color combinations, but more importantly it was an original design. The card I created for the Blog Hop is based on this design

  The only thing I did differently to the design was add the pinked edges to both sides of the base card. A close up shot of the tag. I stitched a felt heart (cut from one of my Love Lives Here die) to the tag.


  I also created a 2nd card using the same color combination, but reversing them. I also changed the impression in the background and added heart shaped pearls by the sentiment.


   Colored twine was used on this tag.

       Is there a card you prefer? Do you think one background impression works better than the other? 
      Thanks for stopping by. I'm off to enjoy the rest of the creations  featured on the Blog Hop.

Monday, January 23, 2012

Thank You Card

   A short post tonight. Just got done making this card for a forum member who did a favor for me.  Not my typical card; a little out of my comfort zone. I rarely work with pattern papers; never mind these colors. I decided to use one of my Tag It Stamp sets since I have several, but rarely use them.


      A close up shot of the focal point.


     I think I am going to play along with Rhonda's Thankful Thurdays. You can check it here for details.
Thanks for stopping by.

Sunday, January 22, 2012

Valentine Hearts

  My" to do" list for crafting gets longer & longer. I just need to find time and also quit spending hours on a card. I am in awe of people who can whip up a card in no time. If I have an idea in mind, it does go faster, but lately the ideas are nowhere to be found. 
      Decided to make valentines for my granddaughters since I had an inkling of an idea. Because they are both toddlers, they love to carry around the cards I make for them. They also love it when the card is a shape. Getting out my Wishblade, I cut some hearts.


   Since I am not a wizard when it comes to operating this "contraption" I had to score the top of the cover and paste it to the card's interior. 


    This one is for Olivia, the "Queen of Purple".  The different color will also allow them to tell their cards apart from each other to avoid "squabbling."  She has the same inside sentiment except it is done in red & purple.

   
Since I had my machine out, I decided to make a card to send to either my aunt or uncle or one of my in-laws.  Haven't put a sentiment inside yet. It'll be less juvenile.

  Thanks for stopping by.  Valentine's Day is about 3 weeks away. Best get "hopping" on making your cards.

Supplies: PTI CS: Pure Poppy, Sweet Blush; purple (from my stash)
Stamp Set: 2010 Love Tags, Flower Fusion #6, Boy Basics: Frog Hop
Ink: Memories: Black; PTI: Pure Poppy
Dies: Boy Basic: Frog Hop, Heart Border
Other: PTI DP: Simple Valentine, Heart Punch (inside card), dimensionals, Wishblade hearts, Hero Arts: heart shaped pearls, Itty Bitty Vinyl letters, Black beads

Thursday, January 19, 2012

Another 60th Birthday Card

  Just a quick post today.  I made this card for my son to give to his dad for his birthday last Sunday.  I already had the numbers cut from my Wishblade so it was just a matter of coming up with a design and assembling it all.


   I just love Kraft with Aqua Mist & the Woodgrain IP. Makes a great masculine card. Stamping text on the numbers just adds a little pizazz since bling just doesn't work for a male!  Here's a peek at the inside.


    Thanks for stopping by.

Supplies: CS Aqua Mist, Kraft, White
Ink: Palette: Noir Black
Stamps: Say It with Style, Text Style, Mak A Wish Additions
Other: Mat Stack 1, Woodgrain IP, dimensionals

Wednesday, January 18, 2012

MIM #49 Ghost Masking

     This week's MIM is a technique demoed by Betsy Veldman called ghost masking.  I knew I just had to try it. After I viewed the video a couple of times, I knew I wanted to use the Mat Stack 4 die with flowers. I chose the Bloom Builders stamp set. Next I needed to decide on colors. My inks are limited. I figured the bright, bold colors would work best. However, I didn't want to use the same colors as Betsy. I went with pastels instead. There was a hesitancy on my part to use light colors since I didn't know what the effect would be when one stamped off on the second round of stamping.  Would there still be ink left to leave an impression?  Well, here's my card.


         I ended up tracing around the edge of the Mat Stack die to have a border. The card looked fine without it, but I decided to add it at the end. The die moved a tad  as I was doing this, so the right bottom is off.     
       I have never made a card where I "stamped off" the image on scrap before I stamped it onto my card. So I didn't know how much pressure to apply even though I tried it on scrap paer before I stamped my card. Turns out I was a little heavy handed stamping the script.  The bloom in the top right has a purple tinge to it instead of pink. I think this was a result of some black ink getting on the stamp when I stamped off.
   I liked this technique and plan to use it again.
   Thanks for stopping by.

Supplies: PTI CS:  Sweet Blush, Vintage Cream 
Ink: Memento: Summer Sunrise, Pear Tart; VersaMagic: Pixie Dust; Memories: Black
Stamps: Bloom Builders, BB: Text Style
Other" Martha Stewart Butterfly Punch, rhinestones, Micron Pen

Tuesday, January 17, 2012

Celebration

Sunday was my husband's birthday. He entered a new decade: the 60's. That sounds old, but he is still young at heart & very active. We had a family dinner. Of course one can't have a party without a banner. Using my Wishblade I cut triangles out of  Scarlet Jewel cs &  My Mind's Eye: Playground Stripes.  The letters were cut using Lemon Tart cs.


Since I have two young granddaughters, they love to wear party hats. I made these.


Somehow, I was successful enlarging a black & white high school  picture from his senior year. Once I printed it out, I used a template to make the hat.  The little pom pom is made from some silver ribbon, I had in my stash.

I wasn't sure how my husband would react to the party hat, but he loved it.  So did everyone else in the family.


Last but not least, a party needs goodie bags. This is what I came up with.


I used the same pattern paper on the banner.  I stamped the # 60 using Tim Holts's distressed ink: Peeled Paint.  A close up shot.


This is what was inside the bags.

Thanks for stopping by.

Monday, January 16, 2012

Paper Bag Mini Album

  I wanted to do something special for my Husband's 60th birthday. It began with the idea of making a list of 60 things I love about him. The challenge was how would I showcase this? About a month ago, my neighbor, Elise (Bunni on the PTI forum) & fellow PTI enthusiast showed me a mini album she created using  these.

     The bags are 4 5/8 by 8 5/8 and can be purchased at Michaels. 
The first thing one does is tape down the flap end. Then the flap gets folded up toward the bag's opening.
(Sorry for the glare in the picture)

     
Each side of the bag & flap gets decorated. I decided to use a picture from each decade of my husband's life with the date on the large part of the bag. On the flap I  did a sentiment.

Bag #1 As a toddler  (  On the flip side of the large section is the cover. which I'll show you later.)


     Bag # 2 Teenage years


This picture shows how the 2 bottom flaps are placed against each other as a buffer between the two layouts.

Bags 3 & 4 20's & 30's


Page 5 
 Page 6-- 40's

Once again the flaps of the bags as a buffer.


Page 7 & 8 --50's Our daughter's wedding; My dh with his mother

Page 9-- Our first grandchild


Page 10--Summer of 2011. I had really wanted to paste an image of my husband 20 years from now, but  was not successful in accomplishing this. I tried for an hr. before I gave up. So I decided to use a current picture of my dh with our 2nd grandchild.


   The buffer flaps.

   I used my Cinch to bind it.  Here's the cover. The stamp set Life was used.

    I typed ten reasons what I love about my husband  & printed the list on cardstock.  I trimmed the card down to fit inside each bag. I adhered a tab so that the card could be pulled from the bag.  In all I made 5 cards for a total of 60 reasons what I love about my husband.


  Most of the background papers used were from My Mind's Eye True Blue Collection. I used many BB sets on Ocean Tide CS to make my own pattern paper.

I am glad that this project is done. It was fun to make and a bit simpler than a large album. Thanks for stopping by.  Tomorrow I am going to share some of the decorations I made to celebrate.

MIM #48 Creating Backgrounds with Border Dies

     It seems like forever since my last post. ( Monday 1/9) But I have been busy with a birthday project for my husband. His birthday is today. The minute I saw the title for this week's MIM, I knew I wanted to try it.  However, I had too many things I was already making for my husband's upcoming birthday. So the MIM card I had in mind kept getting pushed on the back burner.
    
  Lo & behold last night I had an idea. I would kill tow birds with one stone. Use this technique on the gift bag I was making for my husband and still be able to submit it on time for MIM.


      I used the PTI Edger's #4 to create my own front & center die. The vine leaf border die was cut from My Mind's Eye Pattern Paper: Playground Stripes. I used my Zigzag glue pen to glue the vines down on Scarlet Jewel cardstock before I cut the oval handle using my Coluzzle.(I can wait to see if the oval from the Limitless Layers I ordered tonight will work instead)


  I used Mat Stack 1 along with a sentiment from Say It With Style. The bow was made with the same pattern paper using the small Loopy Daisy Die. Finally, I was able to use a large button from my Scarlet Jewel stash of PTI buttons. This bag really looks beautiful in person. I liked how it turned out
 Stop by tomorrow and I'll show you the project I was working on that made it into this little bag.